¶ Steps to create an event type in calendar integration
Click on the Events tab and the New Event Type button on the right-hand side.
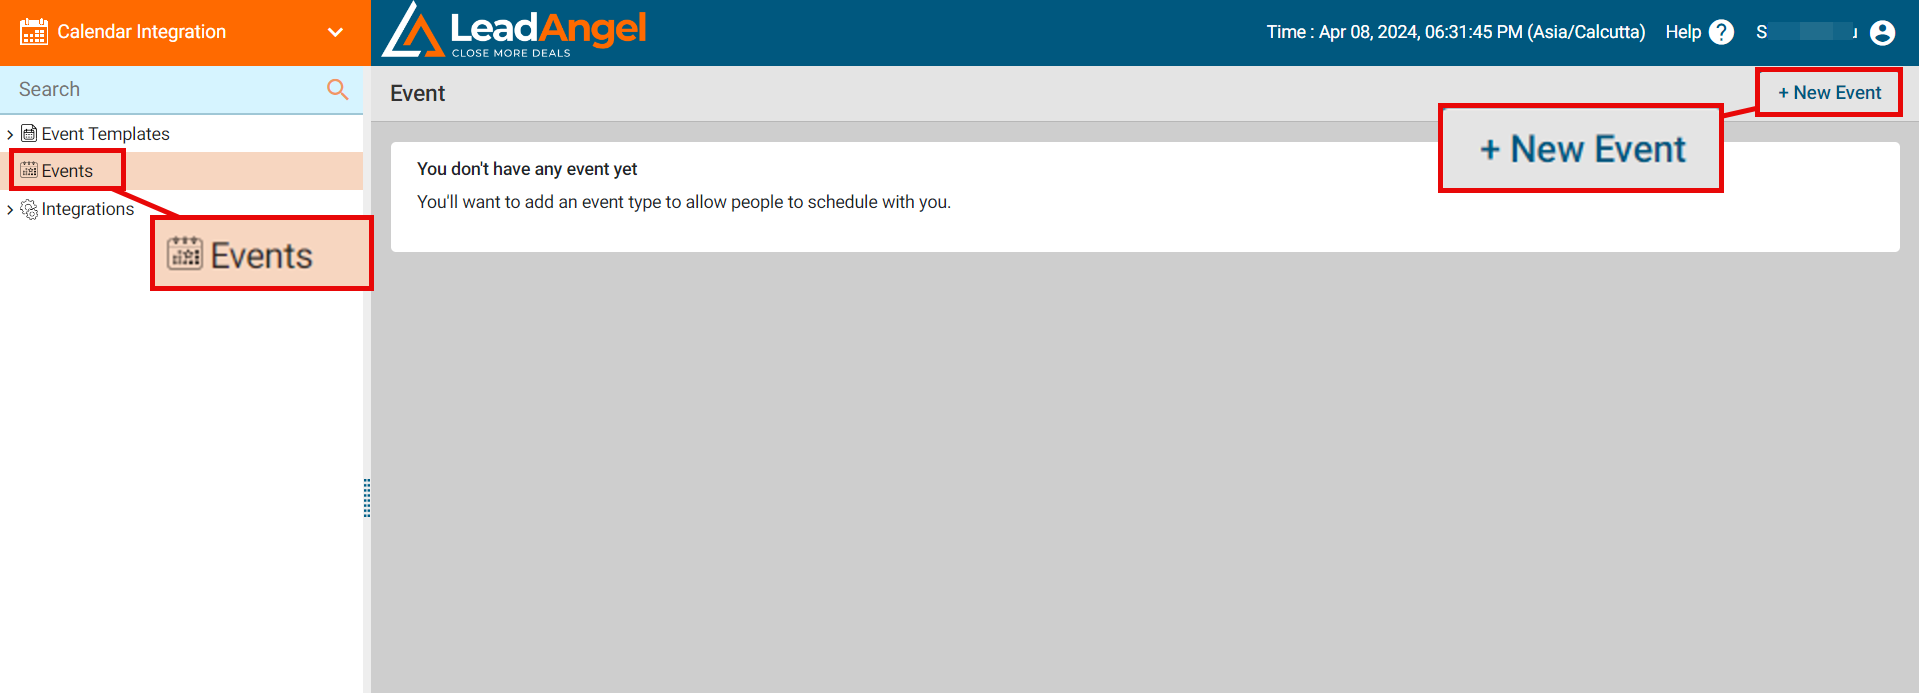
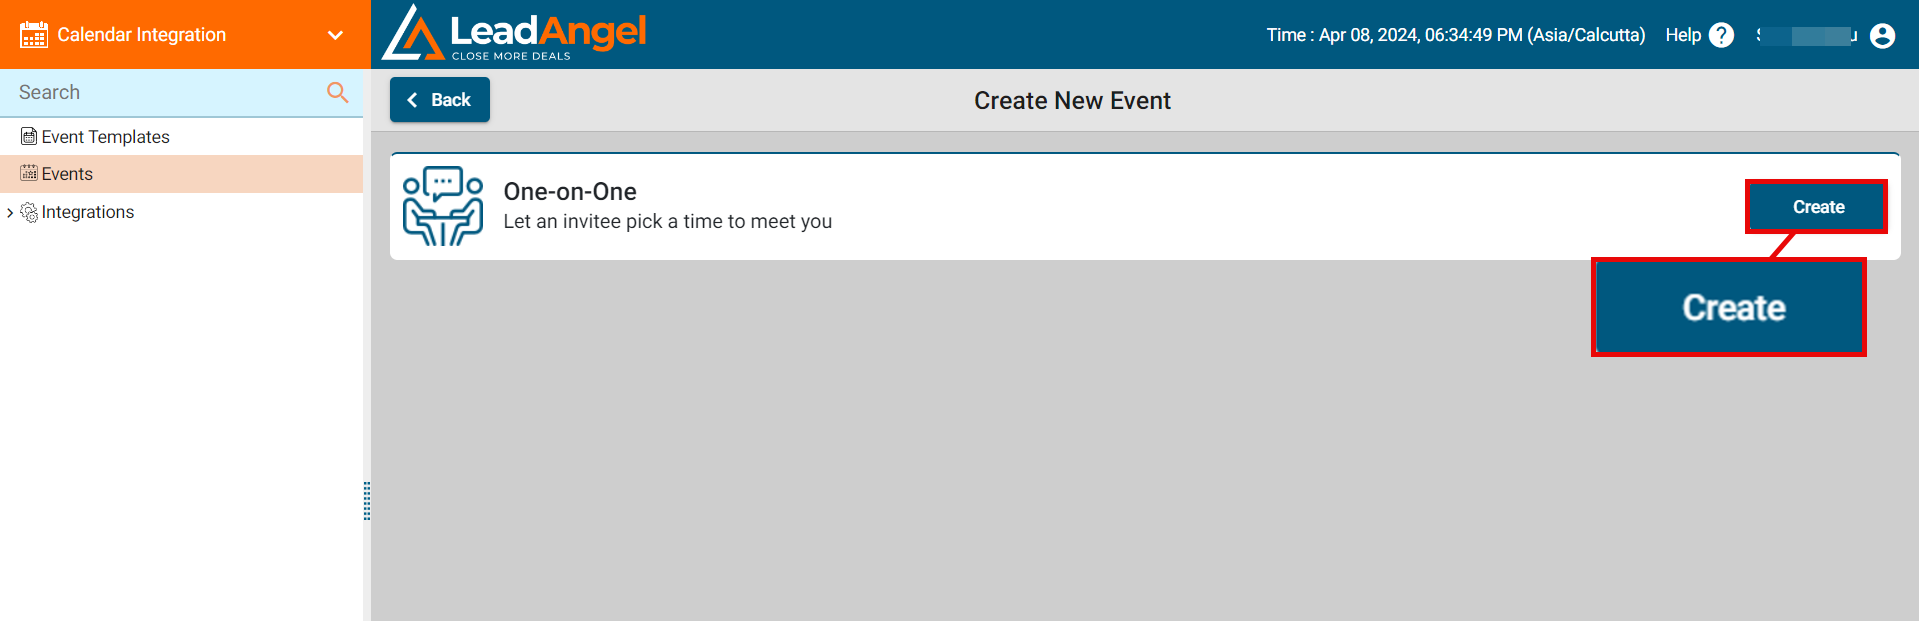
While you click on New Event Type, you will see the One-on-One meeting type on the canvas. Click on Create to schedule an event. A maximum of 4 events can be created at a time.
To create an event you have to provide the details on the following four points:
- What Event is this?
- When can people book this event?
- Invitee questions
- Notification Policy
Fill in all the details related to the event mentioned on the page.
¶ 1. What Event is this?
-
Name the event.
-
Location: Ascertain where you want this event to happen. You may select:
- Google Meet
- Microsoft Teams
- One-on-One Phone
- In-person Meeting
- Zoom
-
Event links will automatically be created. Each event gets a unique event link.
-
Thank you page URL is automatically set in default mode. To use your custom landing page, provide the URL by selecting custom URL in the dropdown.
-
Checkbox options:
-
Allow guests to cancel: This option, available in Event Templates under Calendar Integration, lets invitees cancel meetings directly. When enabled, a Cancel URL is included in the selected user's email.
-
Allow guests to reschedule meetings: This option, available in Event Templates under Calendar Integration, lets invitees reschedule meetings. When enabled, a Reschedule URL is included in the selected user's email.
-
Allow to add guests: Shows Add Guest button in the event detail page, so a user can add guests to the event, by default this checkbox is checked.
-
Show host timezone: Shows host timezone in the event detail page, by default this checkbox is checked.
-
Show guest timezone: Shows guest's timezone in the event detail page, by default this checkbox is checked.
-
Radio button options: Choose to show the event to all Web to Lead forms or only to selected Web to Lead forms.
-
Select one or more Event Groups from the dropdown.
When creating or editing an Event Template, you’ll see an option:
“This event is part of following event group.”
If selected, the event belongs to the chosen group(s).
Event Groups let you organize multiple calendar events into buckets. You can then decide which group of events should be shown to leads based on routing rules.
¶ Once a lead is routed (through web to lead or web to contact form), here’s how the system decides what booking page to show:
If the sales rep has configured LeadAngel Calendar AND the Event Group option is selected in the Assignment Block →
The booking page will display all the events that are part of the selected Event Group.
If the sales rep has NOT configured LeadAngel Calendar →
This setup has no effect. The lead will be redirected to the calendar link provided directly by the sales rep.
If the Event Group option is NOT selected in the Assignment Block →
The lead will again be redirected to the sales rep’s calendar link (either their LeadAngel calendar or their own external calendar).
If the selected Event Group has no associated events →
The system will show the message: “No meeting event found.”
Configure Event Group in the Router (to be selected in Web to lead or web to contact form):
Inside the Assignment Block of your Lead Router, scroll down to find the option:
“Show calendar events from following event group.”
- Check the box.
- Choose the Event Group from the dropdown.
This ensures that when leads are routed through this block, they’ll only see events from the selected Event Group.
- Add a description about the event and click Next.
- Fields marked with an asterisk (*) are mandatory.
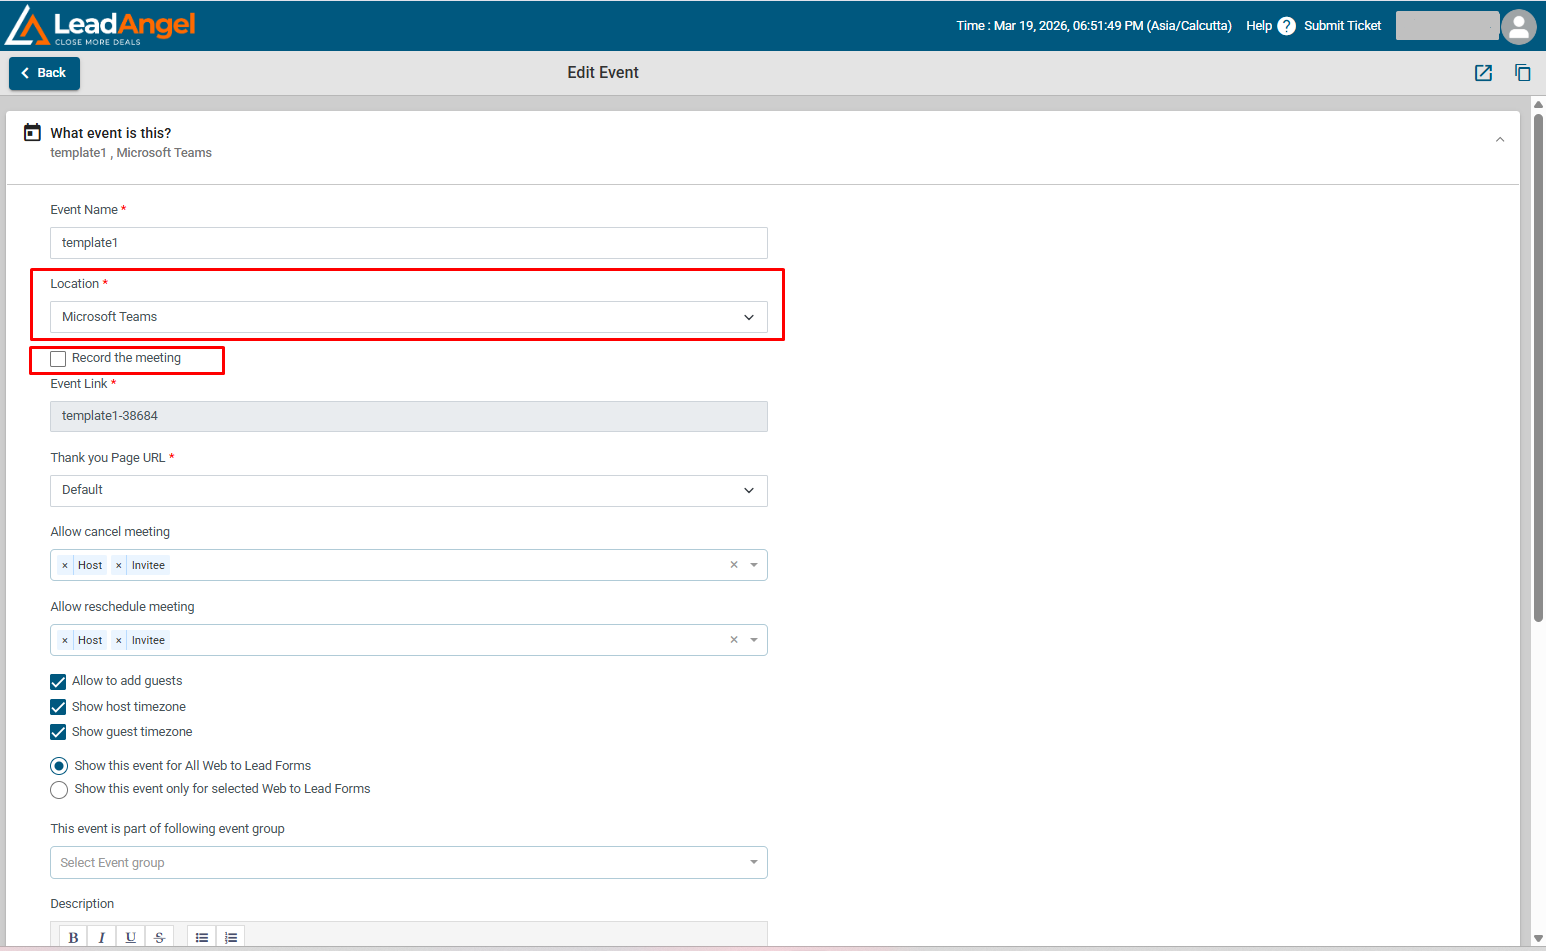
- A new checkbox, “Record the meeting,” is available in Calendar Integration for event and event templates when the meeting location is set to Microsoft Teams.
- This option allows you to define recording preferences at the time of scheduling. When selected, the meeting is recorded automatically; when not selected, the meeting is not recorded.
- This helps ensure important conversations are captured consistently for future reference, supports better documentation, and reduces the need for manual intervention during meetings.
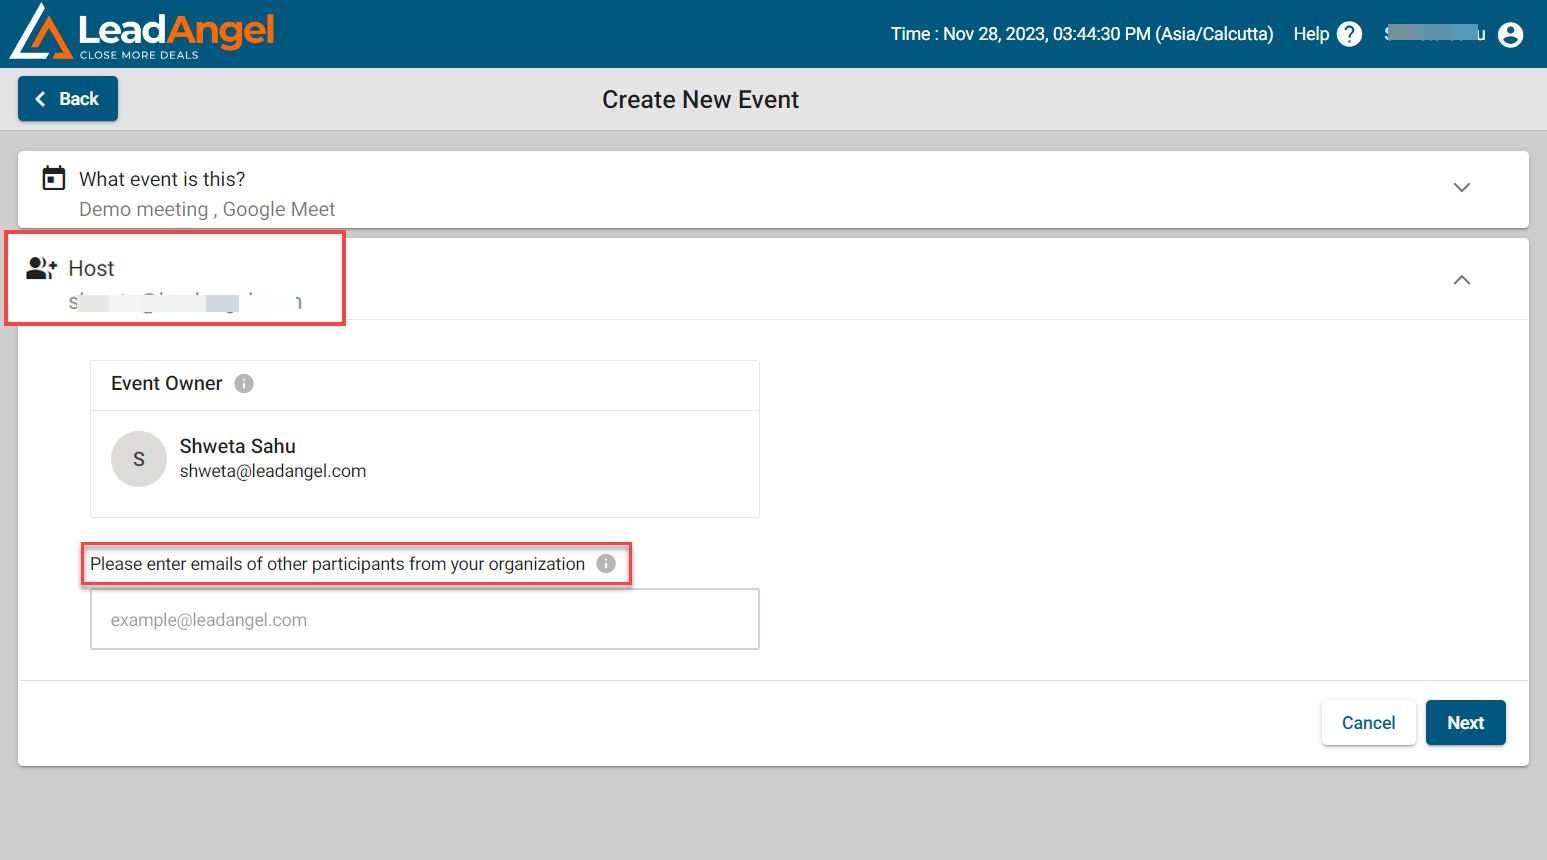
The next page gives you (the host and the owner of the event) an option to add participants from your organization to the event.
- Enter the emails of other participants from your organization to add them to the event.
- You can add up to five participants only.
- Click on the Next button.
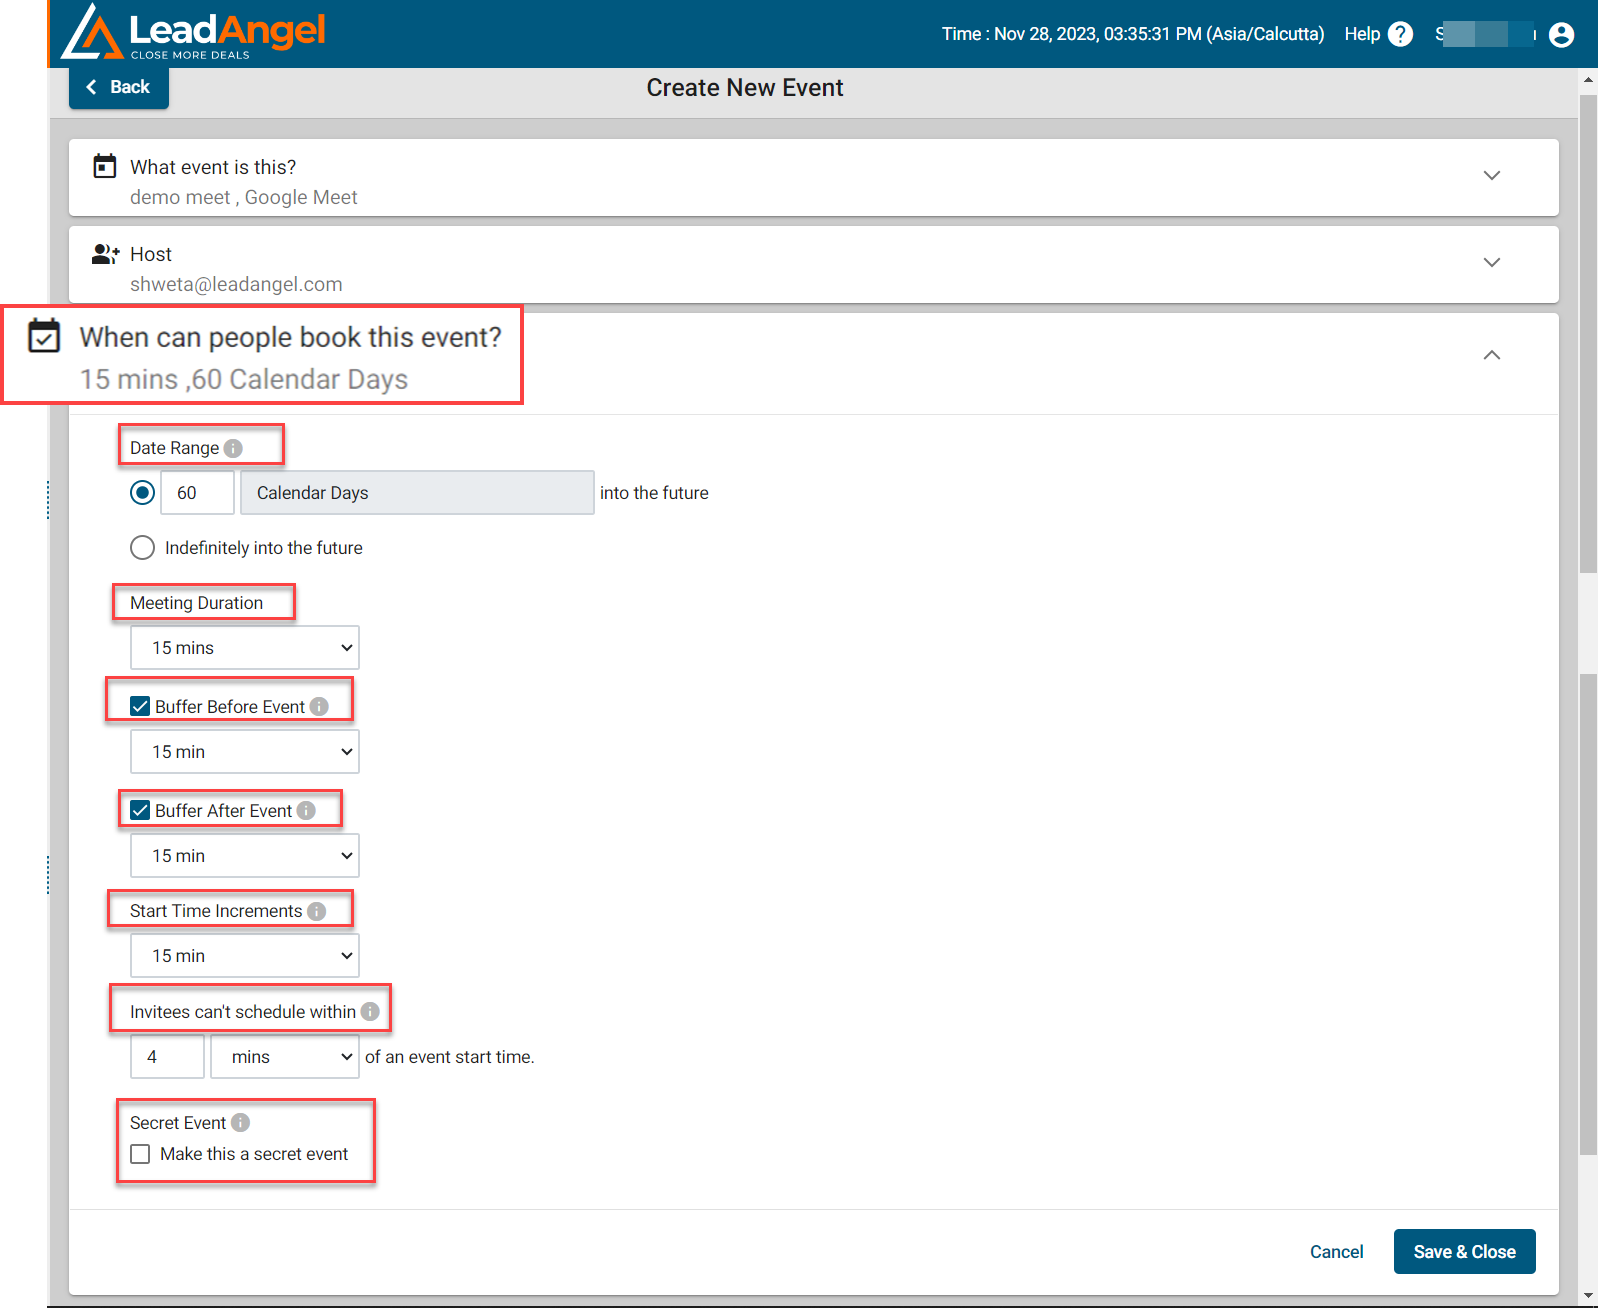
¶ 2. When can people book this event?
- Date Range: Set a range of dates or select indefinitely into the future (up to 99 days).
- Event duration:
- Choose 15, 30, or 45 minutes.
- Or click custom (1–60 minutes or 1–12 hours).
- Buffer time: Set buffer time before and after the event.
- Start time increments: Divide working hours into available slots.
- Invitees can't schedule within: Prevent invitees from scheduling too close to the start time.
- Option: Check Secret Event to hide from event list.
- Click Save and Close.
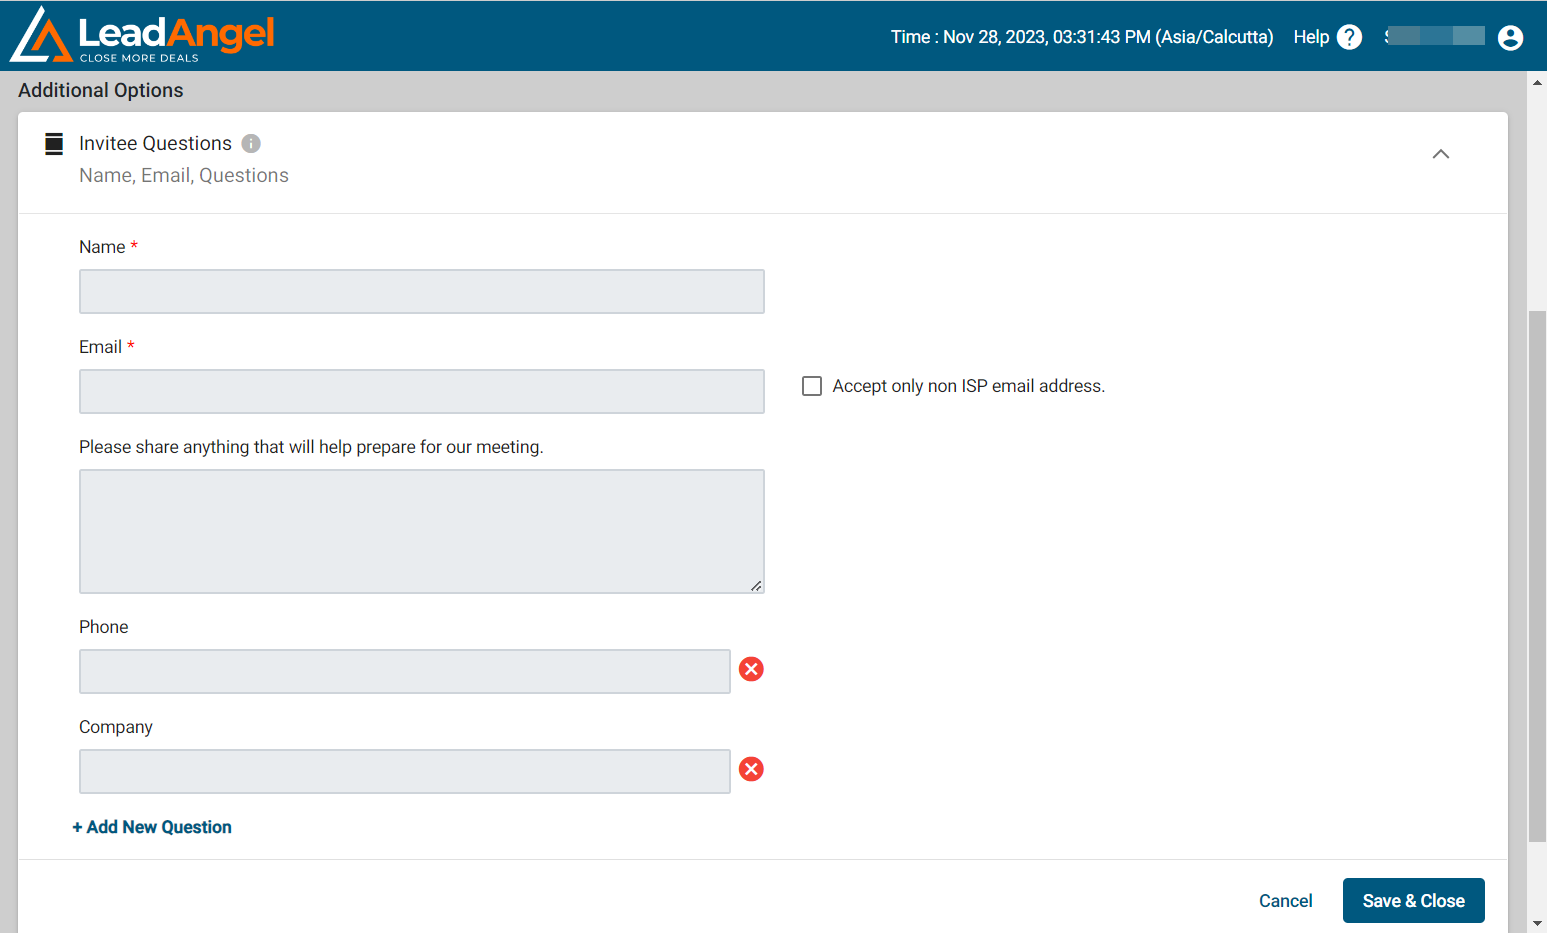
¶ 3. Invitee questions
- All fields under this section are read-only. It can be viewed when the user schedules the event on the booking page.
- Fields marked in asterisk are mandatory and will appear on the booking page.
- On the booking page, you can add input and descriptions to invitee questions.
- If you select Accept only non-ISP email address option then you will receive emails only from non-ISP email addresses.
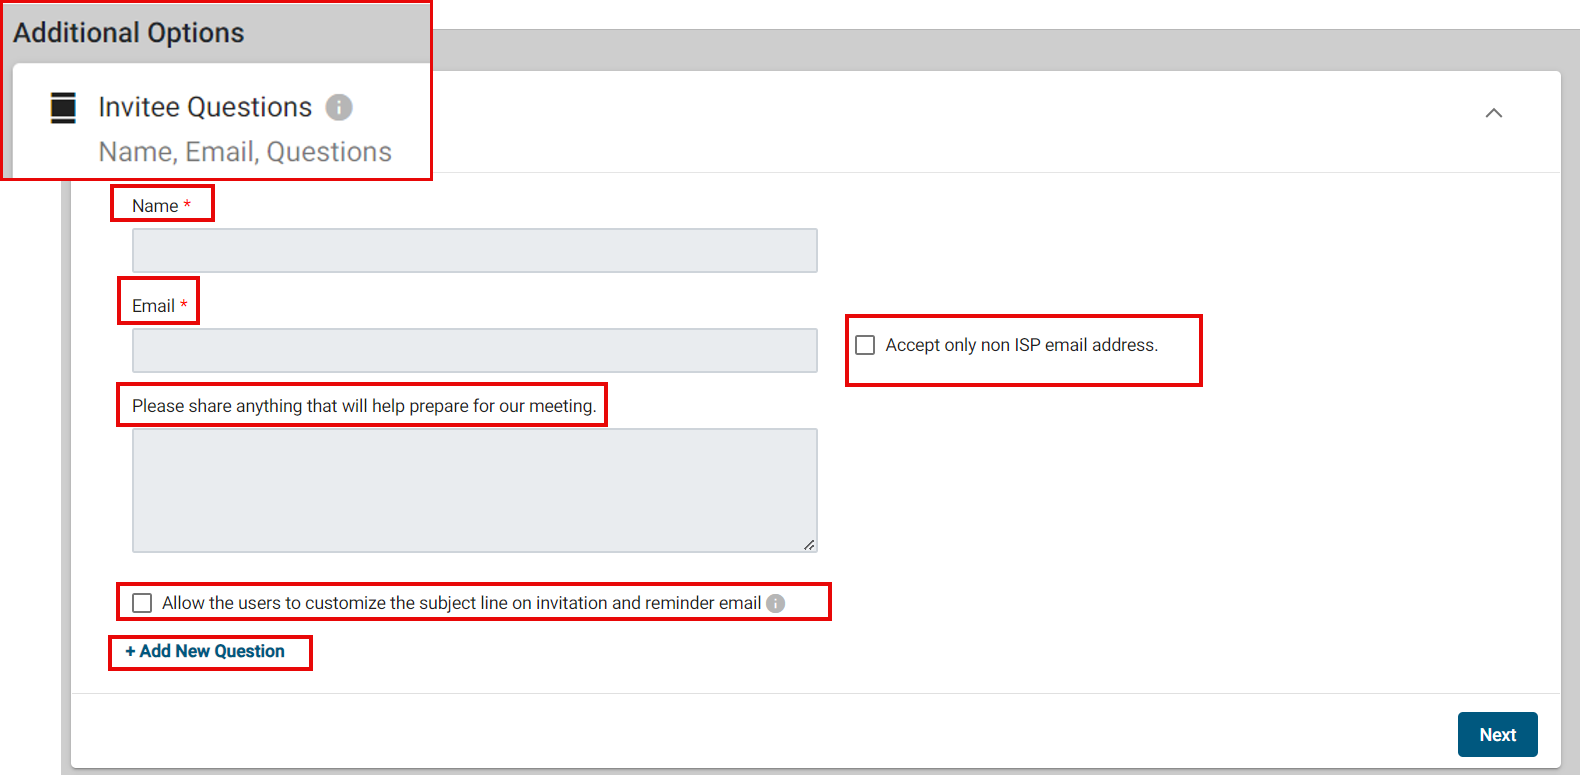
- The checkbox allows the users to customize the subject line on invitations and reminder emails.
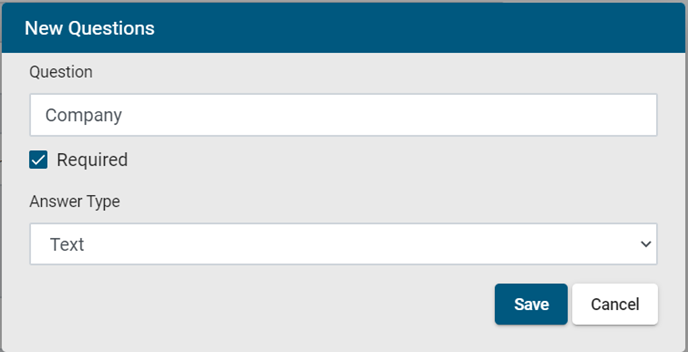
If the Customize Subject Line field is left empty, the invitation email will use the default subject line. - There is an option to Add New Questions under this section. As soon as you click on save a new field will be added. If you check the required box then the invitee has to mandatorily fill in the answers to the questions you have asked.
- Click Save and Close.
¶ 4. Notification Policy
- Invitee will receive a reminder email before the event at a specified time.
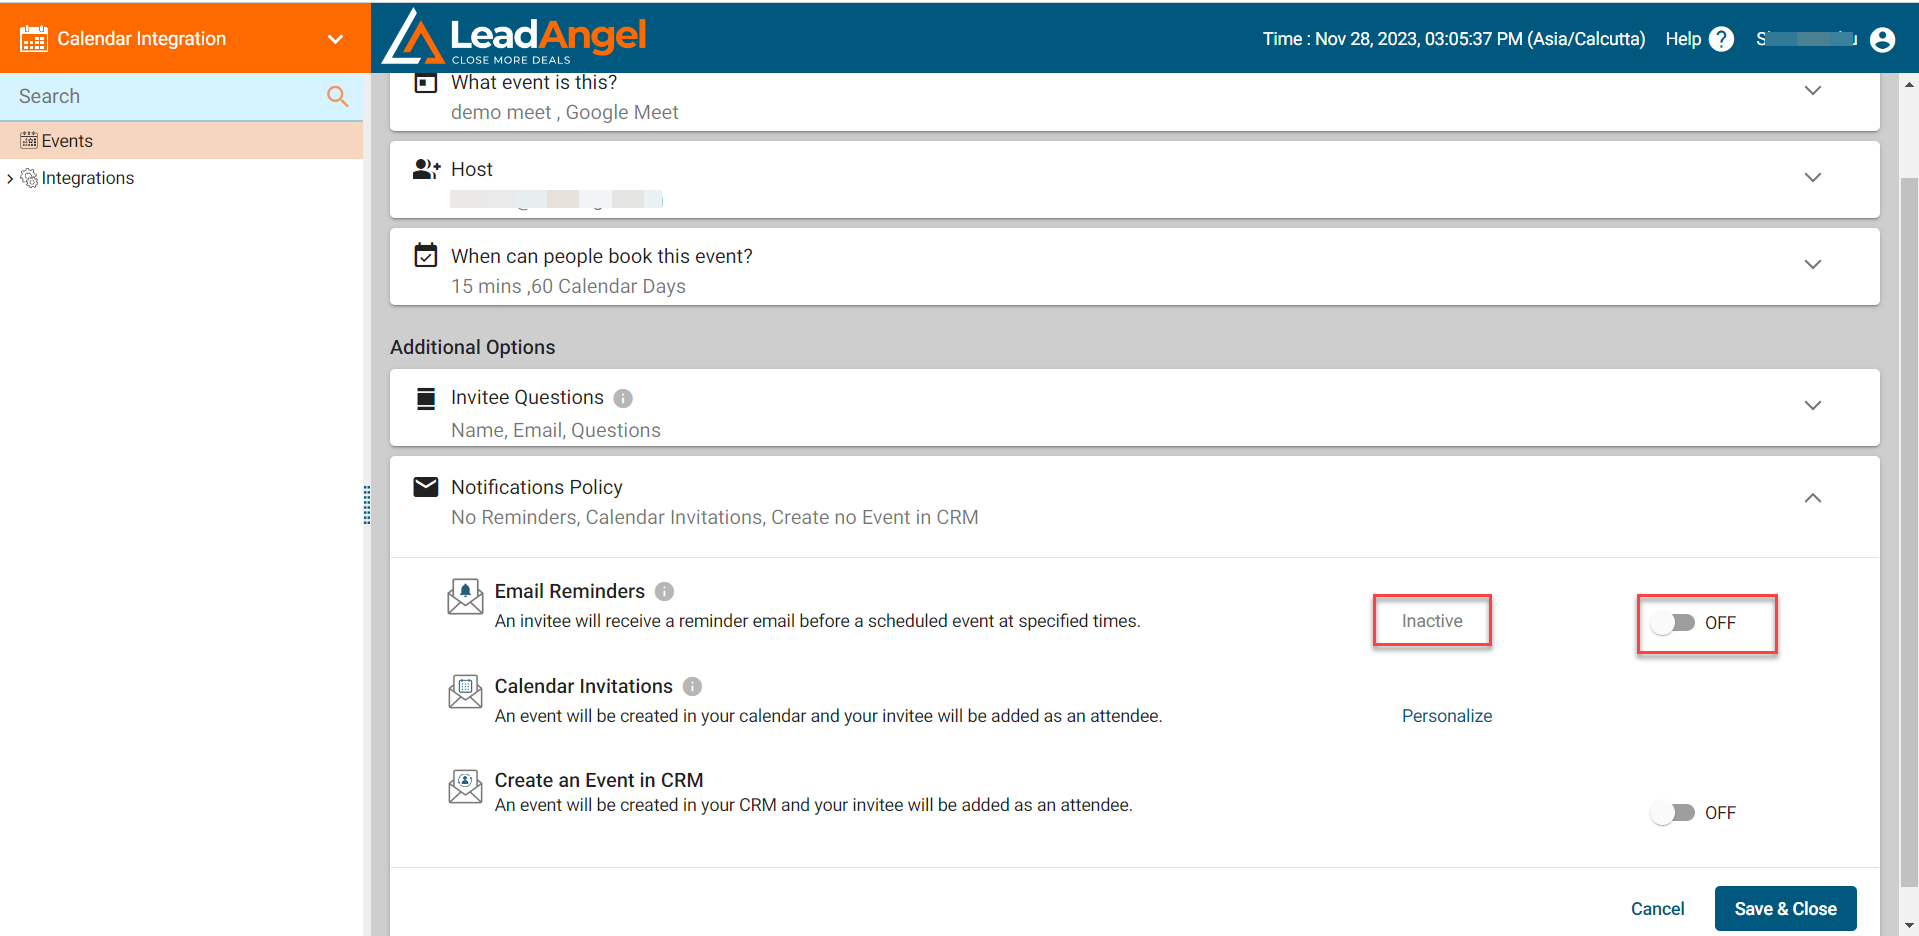
- Click the Inactive button to activate this feature.
- A Personalize link will appear where you fill in:
- Subject / Body of the reminder email.
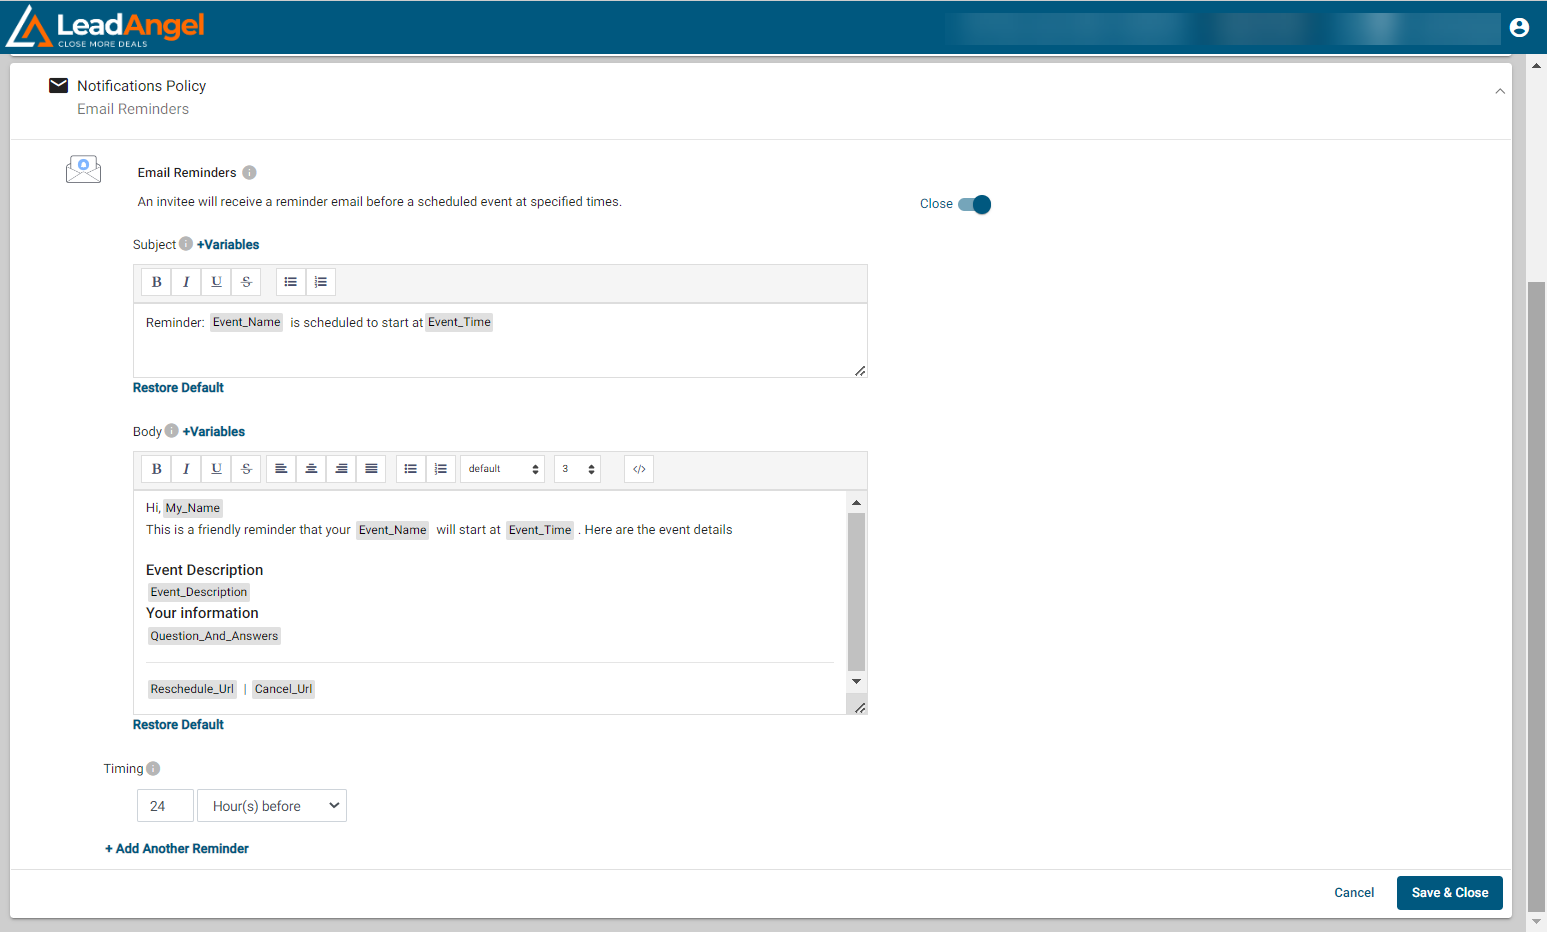
- Subject / Body of the reminder email.
- Maximum of 3 reminder emails can be sent at different time slots.
- Event will be created in your calendar and invitee added as attendee.
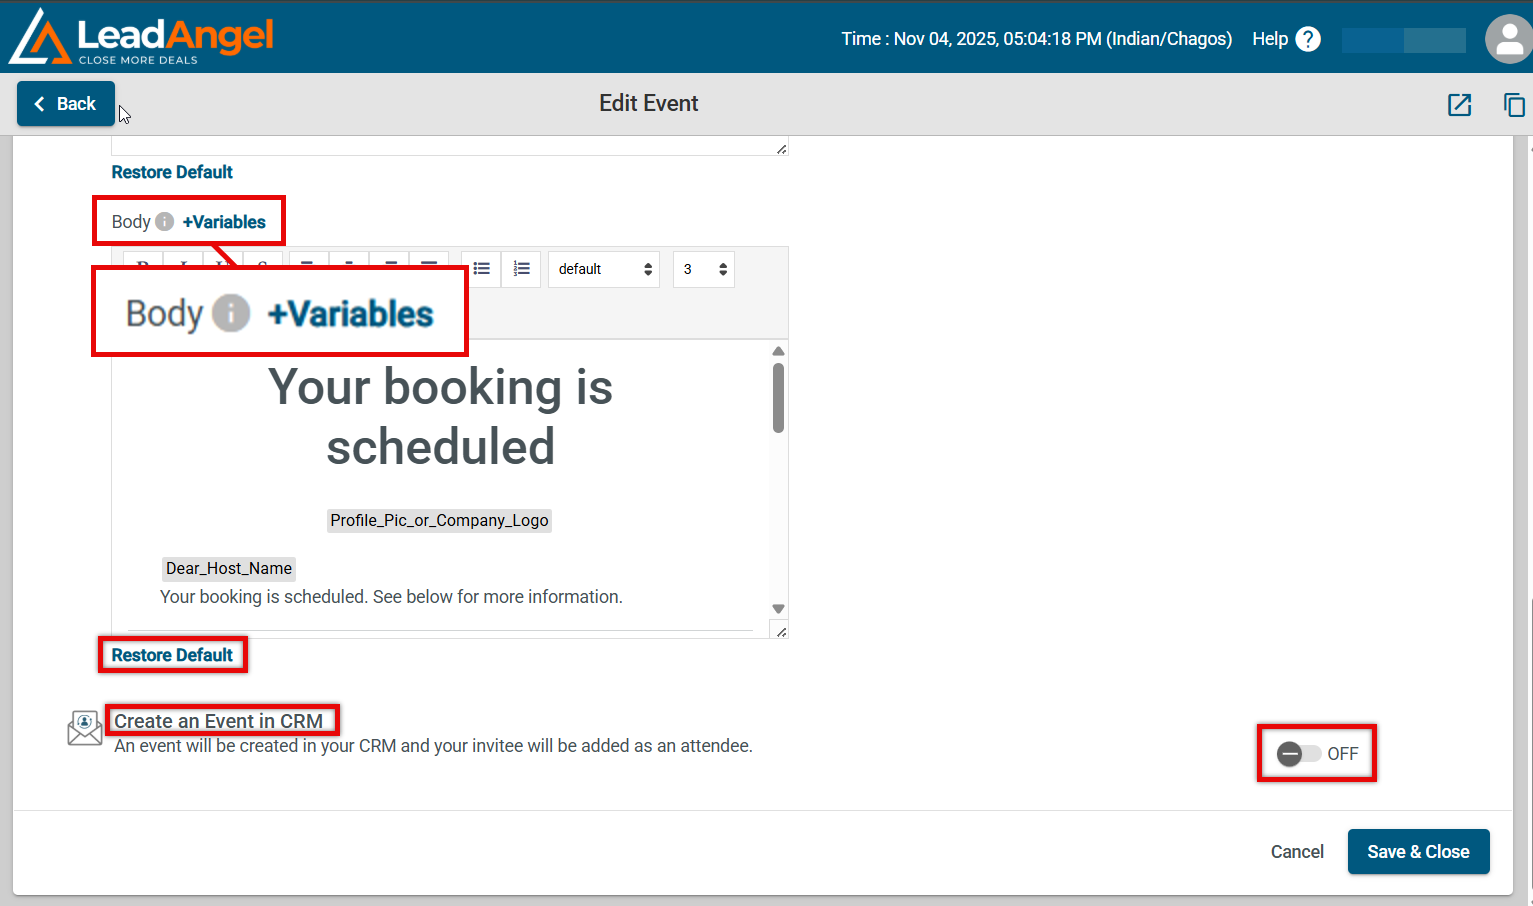
- To customize the subject/body, click the Personalize link in Calendar Invitations.
- By default, the system will display:
- Participant Type: Host
- Notification Type: Create Event
- For customization, use the dropdown menus.
- Participant Type: This option, available in Event Templates under Calendar Integration, allows users to select Host or Invitee while configuring an event.
- Notification Type: This option, available in Event Templates under Calendar Integration, lets users choose from Create Event, Reschedule Event, or Cancel Event to specify when the notification email should be sent.
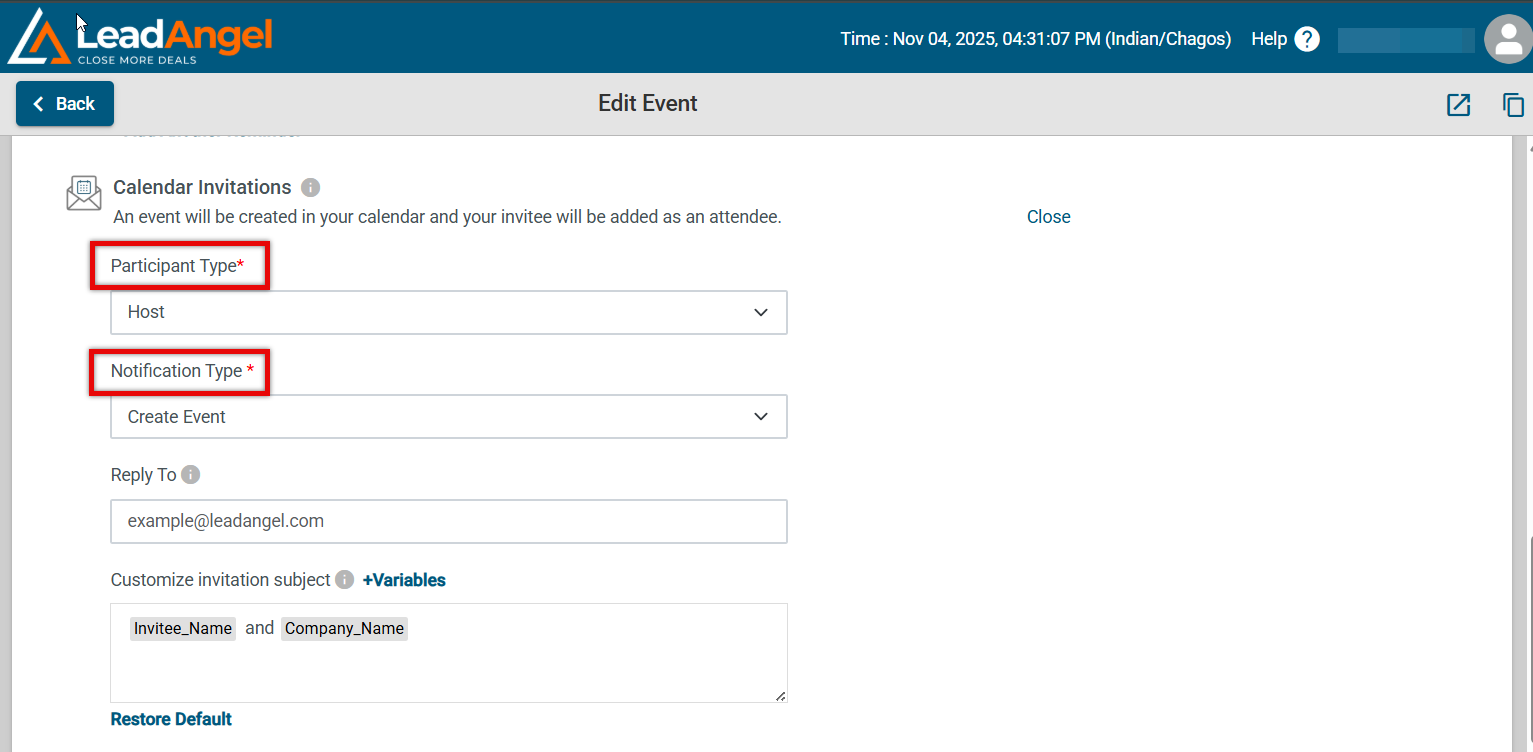
- To customize email content:
- Go to the Email Body Section.
- Edit the email message for each combination of Participant Type and Notification Type.
- The system will show a default email message until a change is made.
- Click Restore Default to revert to the original message.
Note: Both Hosts and Invitees will receive emails as per the customized template defined here.
- Event will be created in your CRM under Open Activities on the Lead Detail page.
- To enable:
- Enable Create an Event in CRM
- Check Upload to CRM under Security Options in the Web to Lead form.
- Click Save and Close.
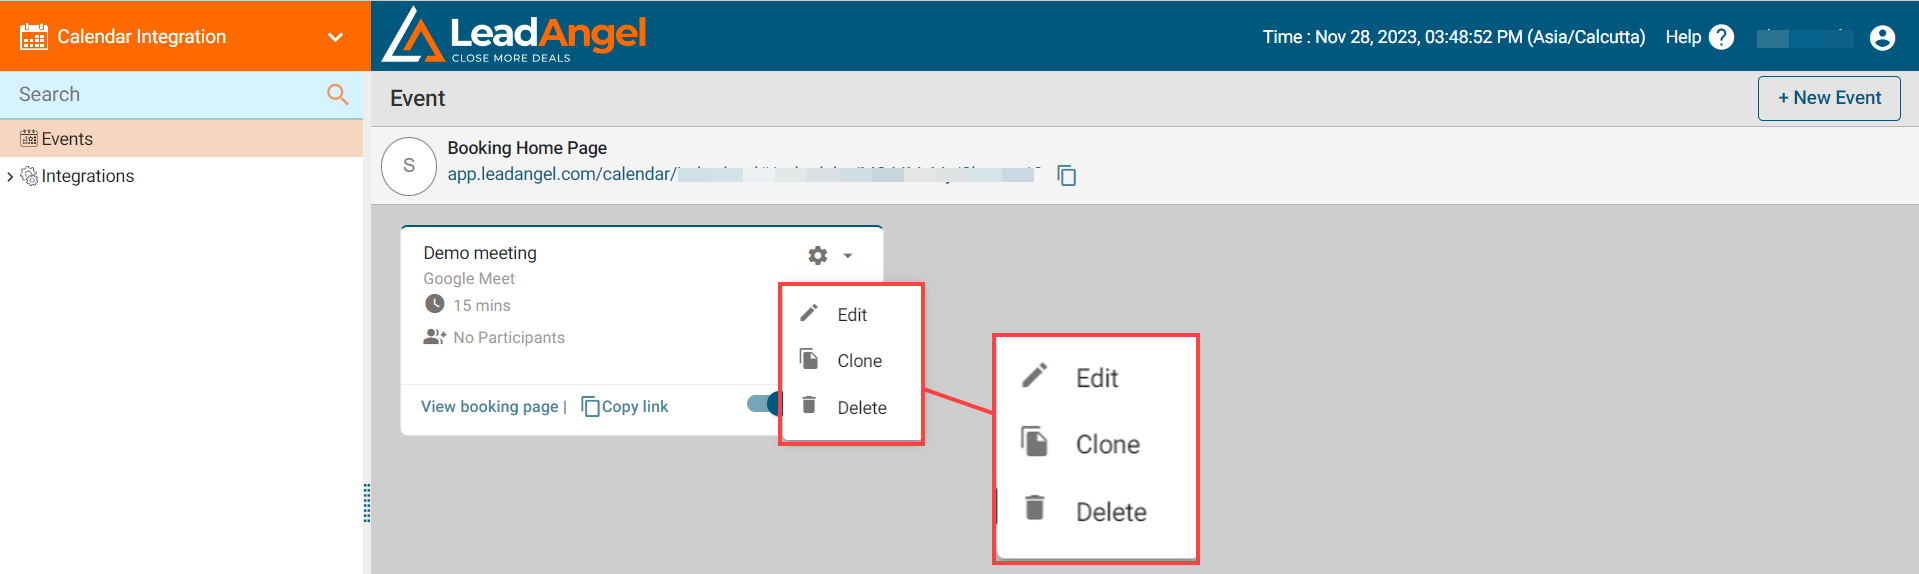
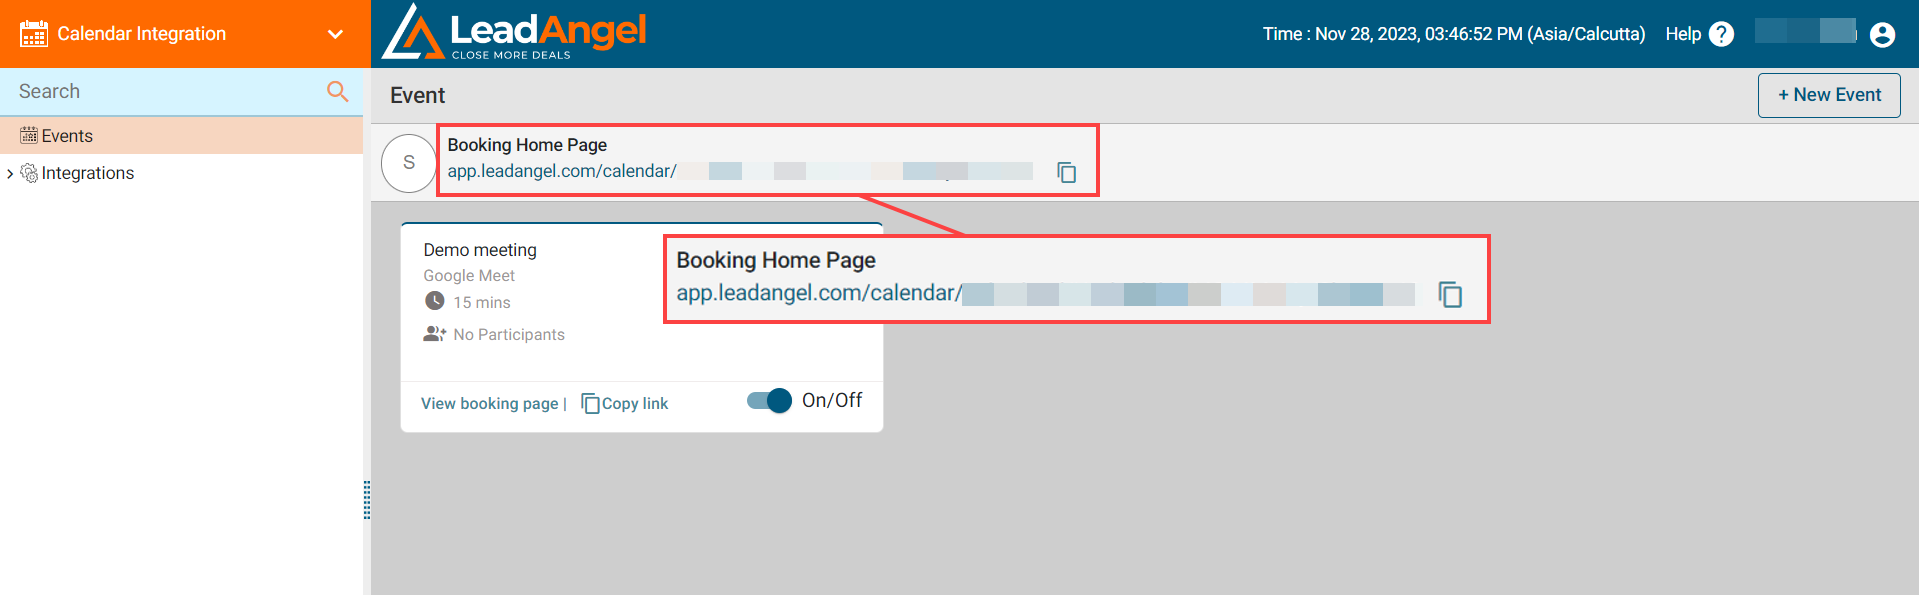
After saving, you will see the Event list on the canvas along with the Booking home page URL. You can click or copy the URL to add an event to your calendar.
To edit, clone, or delete the event, click the dropdown on the event tile.